Home | Model Making | Writing | Photography | Biography | Contact | Links | Blog
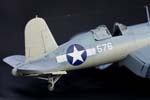
| The F4U Corsair line of aircraft are world famous and well known. The series started with the prototype in 1940 and continued on with improvements and modifications, going through over a half-dozen variants, until the final aircraft was delivered to the French in 1953. That's a good run for an aircraft that the U.S. Navy first considered a failure due to landing and visibility problems. | |
 I've been a fan of the Corsair for years. We used to go to a lot of museums and air shows when I was child, and I can remember standing in front of one of these monsters (they are HUGE aircraft) and just being dumbfounded by the size and the weird wing arrangement. It's still one of my favorite aircraft to this day. It's been over 20 years since I've built a model of one, though -- the old Monogram 1/48th scale kit with moving parts (!) -- so I wanted to give it a go again. I've been a fan of the Corsair for years. We used to go to a lot of museums and air shows when I was child, and I can remember standing in front of one of these monsters (they are HUGE aircraft) and just being dumbfounded by the size and the weird wing arrangement. It's still one of my favorite aircraft to this day. It's been over 20 years since I've built a model of one, though -- the old Monogram 1/48th scale kit with moving parts (!) -- so I wanted to give it a go again. |
|
Paints Used
|
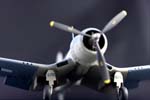
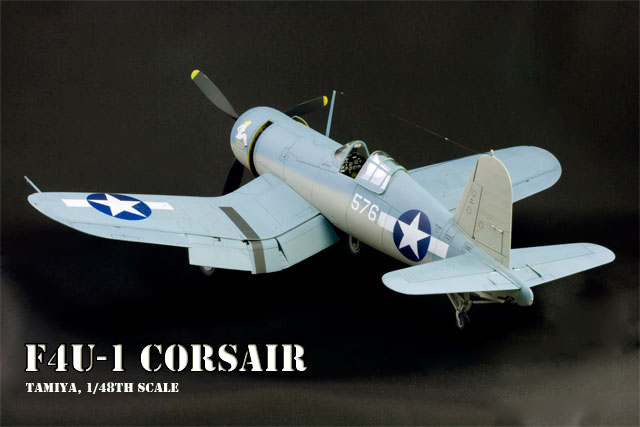
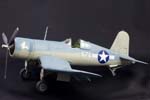
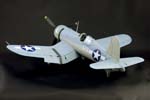
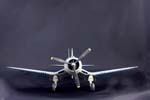
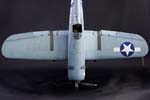
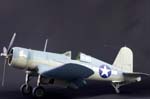
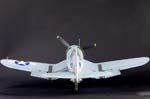
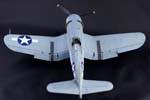
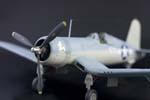
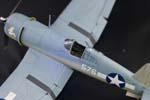
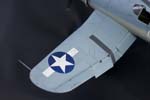
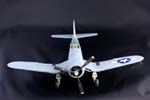
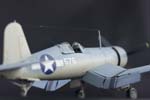
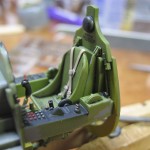
This is the nearly perfect Tamiya 1/48th scale kit of the F4U-1 Birdcage variant. Assembly was a piece of cake, and below the photo gallery I have links for my blog posts that show the build progress. I had very few problems with the model, and the ones that I did have were completely self imposed. I bought this model over 10 years ago and stuck it on the shelf, and when I recently opened it I found that it had an aftermarket resin engine and exhausts as well, so I used them. They are nice improvements, but there's nothing really wrong with the kit components. The early Corsairs had this funky salmon-colored primer in the One other modification I made was to use an aftermarket canopy of vacuum-formed plastic. The clear styrene canopy included with the kit is great, but when in the open position, its thickness makes it sit noticeably too high on the fuselage. The thinner vacuum formed piece sits more accurately. It was a pain to get that thing cut out and painted, though! I painted the national insignia using Montex masks. The multi-layered process approach to painting the insignia worked really well, and I wish I'd had masks for the numbers, but the decals look good enough.
|
I had planned to really weather this thing, as it was a hard-used war bird, but as I got close to finishing it, I really liked the cleaner look. I used MIG pigments pre-mixed wash for the panel lines; I felt lazy using their mix and not making my own, but it dries a lot cleaner than my usual oil paint and lighter fluid concoction. I did minimal smoke staining out of the the guns and exhausts using a black pastel pencil, rubbed in with my finger. Final touches are the rigging wire, done with clear sewing thread, stained black with a Sharpie marker, and wingtip lights and recognition lights first coated in silver, then painted with Tamiya's clear red, green and yellow paints, as appropriate. I had a blast building this model, and I'm really happy with the way it turned out. I'm already collecting paints and research for my next Tamiya aircraft build, the 1/48th scale F4F-4 Wildcat. ~June 2012 |
|
| Photos were taken with my Canon 400D (Rebel Xti) and 50mm fixed lens. I used a 24" square fabric photo tent and several external daylight-corrected CFL light sources. Post-processing done in Photoshop using a gray-card reference shot. | |
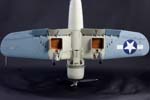
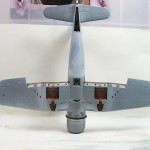 wheel wells. I wanted to get as many colors on this thing as possible, so I went with that, used Interior Green in the cockpit, and all other internal areas are Yellow Zinc Chromate. Vallejo acrylics were used throughout for detail painting, such as instruments, placards, knobs and switches; and their excellent German Gray was used for all instances of black. Pure black in this scale makes things look too toy-like, so I always use really dark gray.
 |
 |
 |
 |
 |
 |
 |
 |
 |
 |
 |
 |
 |
 |
 |
|
 |
 |
Links to Blog build posts:
 * New Project!
* Major Assembly Complete
* Paint
* Markings
* Final Touches